Microscope Lab - Using the Microscope and Slide
Preparation
|
Name ________________ Date _______________ |
 Examine the microscope and familiarize yourself
with the parts of the microscope.
Examine the microscope and familiarize yourself
with the parts of the microscope.
1. Magnification
The magnification written on the ocular lens
(eyepiece) is _____________
The magnification on the Scanning objective
___________ Low Power Objective ___________ High Power Objective ___________
What is the total magnification for each lens
(multiply ocular times objective)
Scanning _____________ Low Power ______________
High Power ________________
2. Diaphragm
Examine the diaphragm, what are the numbers written
on it? ____________________
Which setting makes the specimen the lightest?
________________ The darkest? _______________
3. Lenses
Twist the ocular lens, does yours have a pointer?
_____________ What is the purpose of the pointer?
__________________________________________
Find out what happens to your viewing field if you
do not have an objective fully clicked into place.
____________________________________________
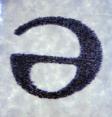
4. Viewing a Slide
Obtain a prepared E slide. Focus the slide first
with the scanning objective, then click to lower power and focus again.
Finally, focus the slide under high power. Remember, at high power, you should
ONLY use the fine adjustment knob.
Draw the E exactly as it appears in your viewing
field for each magnification. The circles below represent your viewing field.
The E should take up as much space in the drawing as it does in your viewing
field while you're looking at it.
|
Scanning
|
Low Power
|
High Power
|


5. Depth Perception
Obtain a prepared thread slide. You will only need
to view it under scanning at this point. Your task is to figure out which
thread is on top, which is in the middle, and which is on bottom. You should
notice that as you focus the thread, different thread will come into focus at
different times. The one that comes into focus the first should be the top
thread.
What is the color order of your threads?
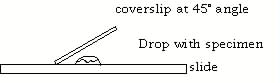
6. Making a Wet Mount of a Slide
1. Gather a few strands of cotton from a cotton ball using forceps. If
your specimen is too thick, then the coverslip will wobble on top of the sample
like a see-saw, and you will not be able to view it under High Power.
2. Place ONE drop of water directly over the specimen. If you put too
much water, then the coverslip will float on top of the water, making it hard
to draw the specimen, because they might actually float away. (Plus too much
water is messy)
3. Place the coverslip at a 45 degree angle (approximately) with one
edge touching the water drop and then gently let go. Performed correctly the
coverslip will perfectly fall over the specimen.
Draw the specimen as it appears in your viewing field under scanning,
low and high power.
|
Scanning
|
Low Power
|
High Power
|


7. Staining a Specimen
1. Place one drop of stain (methylene blue) on the edge of the
coverslip. Caution: Methylene Blue will stain clothes and skin!
2. Place the flat edge of a piece of paper towel on the opposite side of
the coverlip. The paper towel will draw the water out from under the coverslip,
and the cohesion of water will draw the stain under the slide.
3. As soon as the stain has covered the area containing the specimen,
you are finished. The stain does not need to be under the entire coverslip. If
the stain does not cover as needed, get a new piece of paper towel and add more
stain until it does.
4. Be sure to wipe off the excess stain with a paper towel.
Draw your specimen as it appears under low power. Used color pencils to
show how the stain appears. It may appear darker or lighter in spots. Use
shading to show darker and lighter spots.
|
Scanning
|
Low Power
|
High Power
|


|
8. Investigation of Pond Water 1. Prepare a wet mount of pond water - a sample of pond water is
provided in a jar. The best specimens usually come from the bottom and
probably will contain chunks of algae or other debris that you can see with
your naked eye. (Be careful that your slide isn't too thick) 2. Use the microscope to focus on the slide - try different
objectives, some may be better than others for viewing the slide. 3. Use reference books (provided in class) to identify at least three
different things (protists, algae, insects..etc) in your pond water. You may
want to color your pictures. 4. Make three separate drawings below at different areas of the slide
and at different magnifications. Label where appropriate. |
|
E.
Measurement of microscopic specimens
Very
often you will want to know the size of microscopic specimens. To be able to
estimate the size of these objects, you will want to know the width or diameter
of your microscopic field.
1.
Cut the metric ruler from the last page of this handout.
2.
Place the ruler on a slide (otherwise you may not have enough range to get it
into focus)
3.
Place the ruler over the opening in the stage so that the scale may be seen.
4.
Under the lowest power, line up one of the vertical lines so that it is just
visible at the left side of the field of view.
5.
Determine the number of millimeters distance from one side to the other side of
the field of view. It may be necessary to estimate fractions of millimeters.
What
is the diameter of your field of view using a magnification of 100X?
(mm)
(µm)
A
micrometer (µm) is one-thousandth of a mm (0.00l mm) or l000 µm = 1
mm. The µm is used often in microscopic measurements. (l micrometer is the
same as l micron (µ), a slang term that is commonly used.)
To
measure the diameter of the field of view under high power, since it is less
than l mm, we will determine the field of view by knowing the relative
magnification powers of the high power objective and the low power objective:
First get the ratio of these by dividing the magnification of the low power
objective by that of the high power objective. Then multiply this result by the
diameter of the low power objective field.
![]()
(1)
Therefore, what is the diameter of the high power field? mm µm
Does
your answer make sense?
Later,
you will have an opportunity to measure the size of microscopic organisms using
this information.
G.
Observations of Cells under the Compound Light Microscope.
The
Onion Cell
1.
On the supply table is an onion that has been cut into quarters or eighths.
Separate the thick modified leaves that make up the onion bulb. Each inner leaf
is covered by a delicate, thin, layer of cells. Break a leaf and lift off a
small piece of this thin cell layer from the inner leaf surface (you
want a single layer of cells) and make a wet mount of it by placing it
on a slide and then adding a drop or two of water. Carefully place a cover slip
over it, taking care to force out as many air bubbles as possible. (But don't
squash the cells!! We want to look at onions, not squash!)
2.
Observe these cells under lowest power and adjust the light to low levels until
you to see internal structures clearly.
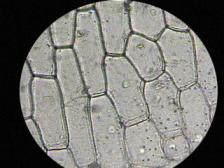
3.
Notice the dark, thick cell walls surrounding each cell. These are
composed of cellulose and form much of the supportive framework of the
plant. Much of the inner volume of the cell is the membrane enclosed vacuole. The cell membrane
would be present between the cytoplasm and the cell wall but it is too thin to
see with out using electron microscopy. The nucleus can be seen as a
slightly grayish blob pressed against the inner side of the cellulose cell
wall. It is embedded in cytoplasm that is pushed against the wall by the large
fluid-filled vacuole in the center of the cell. Some of the nuclei appear to be
centrally located because they are pressed against the top or bottom part of
the cell wall. Do you see any nucleoli in the nuclei?

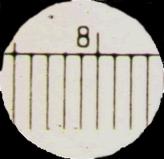
The smallest space on
this scale slide is equal to 0.1 mm
Use the Following Steps to Calculate the Correct
Size
- Determine the
diameter of the field of view using the scale slide.
- Determine the
number of cells needed to cross the field of view.
- Divide the distance
of the diameter by the number of cells needed
- The result is the
size of a cell
The
Above Calculation Using the Slides At The Top Of The Page
- 10 spaces x 0.1mm
per space = field of view = 1.0 mm
- 3 cells across the
diameter
- 1.0 mm diameter/3
cells
- About 0.33
mm per cell
Magnification
of the illustration = size of illustration/actual size
For example, a
magnification of 1X means the illustration is the same size as the object. 100X
means the illustration is 100 times the size of the object, etc. It is
important that you first calculate the actual size of an object and from that
calculate magnification of the illustration you have made of the object.